Copy a table from on-premise server to Azure Data Factory
How to copy a table from an on-premise server to Azure Data Factory using a self-hosted integration runtime.
This tutorial simulates an on-prem environment by creating two servers in the same network.
- One has SQL Server
- The other server has a self-hosted integration runtime (IR) installed to connect to Azure.
Workflow:
- The on-prem IR server connects to the on-prem SQL server to query tables
- It copies the tables to Azure Blob Storage through Azure Data Factory using Parquet files.
- These files are copied to Azure SQL Database for data warehouse.
- Then Power BI connects to this database to create reporting.
Database example
As seen in Create a SQL Server Windows VM.
Using AdventureWorksDW2019 from this Microsoft doc.
Explore the table to copy to Azure
For this tutorial I am going to copy the table dbo.DimCustomer which has the following schema:
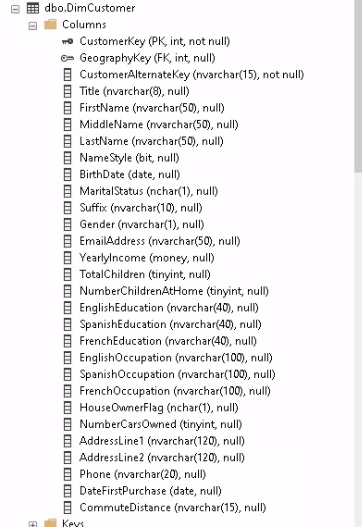
I am only going to keep these columns:
CustomerKey (PK, int)
GeographyKey (FK, int)
CustomerAlternateKey (nvarchar(15))
FirstName (nvarchar(50))
LastName (nvarchar(50))
MaritalStatus (nchar(1))
EmailAddress (nvarchar(50))
YearlyIncome (money)
TotalChildren (tinyint)
HouseOwnerFlag (nchar(1))
NumberCarsOwned (tinyint)
AddressLine1 (nvarchar(120))
Phone (nvarchar(20))
DateFirstPurchase (date)
CommuteDistance (nvarchar(15))
Setup: Self-Hosted Integration Runtime
Follow Azure Data Factory Self-Hosted Integration Runtime to setup two servers that simulate an on-premise private network. You can follow that guide to setup the integration runtime in your actual on-premise network.
- Create a resource group, network security group, and virtual network
- Create a Windows Server SQL Server VM connected to this Vnet
- Create a Windows Server VM connected to the same Vnet
- Install the Self-Hosted Integration Runtime to the Windows Server VM
- Create a Data Factory and create a Self-Hosted Integration Runtime
- Connect the Windows Server VM to this Integration Runtime
Setup: Azure resources for this tutorial
Create these resources under the same subscription, resource group, and location:
Resources
Linked Services
Azure Data Factory Linked Services for:
- On-premise SQL Server
- Blob Storage
- Azure SQL Database
Datasets
Azure Data Factory Datasets for the corresponding Linked Services.
- On-premise SQL Server
- In
Table nameselectedDimCustomer
- In
- Blob Storage (Parquet)
- Azure SQL Database
Create the table in Azure SQL Database
Create the table in Azure SQL Database to map the table from SQL Server. (Alternatively, when using a Copy data from Blob to Azure SQL, in the Sink set to Auto create table for the first run, however all columns are created with nvarchar)
Get the query used to create the table dbo.DimCustomer in SQL Server
- Connect to the Server with the Self-Hosted Integration Runtime.
- Open SSMS
- Connect to the DB
AdventureWorksDW2019 - Right click the table
dbo.DimCustomer - Select
Script table as / Create to / Clipboard - Use
Ctrl Vto paste the query to Notepad++
Open Azure Data Studio and connect to the Azure SQL Database
Run the query:
CREATE TABLE DimCustomer(
    CustomerKey int PRIMARY KEY,
    GeographyKey int NULL,
    CustomerAlternateKey nvarchar(15) NOT NULL,
    FirstName nvarchar(50) NULL,
    LastName nvarchar(50) NULL,
    MaritalStatus nchar(1) NULL,
    EmailAddress nvarchar(50) NULL,
    YearlyIncome money NULL,
    TotalChildren tinyint NULL,
    HouseOwnerFlag nchar(1) NULL,
    NumberCarsOwned tinyint NULL,
    AddressLine1 nvarchar(120) NULL,
    Phone nvarchar(20) NULL,
    DateFirstPurchase date NULL,
    CommuteDistance nvarchar(15) NULL,
);
GO
Pipeline for the Data Factory
- In the Data Factory, Author hub
- On
Pipelinesclick onNew pipeline - Name it
OnpremSQL to AzureSQL
Copy Activity to connect from SQL Server to Blob
- Under
ActivitiesinMove & Transform - Drag/drop
Copy datato the empty canvas - Name it
OnpremSQL to Blob
Set the Source
Source dataset: The dataset for the SQL Server- Use query set to
Table- Other options: Query, Stored procedure
- Query timeout (minutes)
120(default)Timeout for query command execution, default is 120 minutes. If parameter is set for this property, allowed values are timespan, such as "02:00:00" (120 minutes).
- Isolation level
None(default)Specifies the transaction locking behavior for the SQL source. The allowed values are: ReadCommitted, ReadUncommitted, RepeatableRead, Serializable, Snapshot- See docs here
- Partition option
None- Other options
- Physical partitions of table
When using physical partition, ADF will auto determine the partition column and mechanism based on your physical table definition.
- Dynamic range
When using query with parallel enabled, range partition parameter(?AdfDynamicRangePartitionCondition) is needed. Sample query: SELECT * FROM <TableName> WHERE ?AdfDynamicRangePartitionCondition
- Physical partitions of table
- Other options
- Click on
Preview Datato validate settings before triggering a run or publishing the pipeline- It shows an overlay with
dbo.DimCustomer
- It shows an overlay with
Set the Sink
Sink dataset: The dataset for the Blob Storage- Copy behavior
None- Other options: Add dynamic content, Flatten hierarchy, Merge files, Preserve hierarchy
Specify behavior when copying files between file systems.
- Max concurrent connections
no valueThe upper limit of concurrent connections established to the data store during the activity run. Specify a value only when you want to limit concurrent connections.
- Block size (MB)
no valueSpecify the block size in MB when writing data to Azure Blob Storage. Allowed value is between 4 and 100 MB.
- Metadata
no valueSpecify the custom metadata with metadata key and value.
- Max rows per file
no valueWhen writing data into a folder, you can choose to write to multiple files and specify the max rows per file.
Set Mapping
- Type conversion settings
- Allow data truncation
Enabled(default)Allow data truncation when converting source data to sink with different type during copy, e.g. from decimal to integer, from DatetimeOffset to Datetime.
- Other settings:
- Treat boolean as number
Treat boolean as number, e.g. true as 1.
- DateTime format
Format string when converting between dates without time zone offset and strings, e.g. "yyyy-MM-dd HH:mm:ss.fff"
- DateTimeOffset format
- TimeSpan format
Format string when converting between time periods and strings, e.g. "dd\.hh\:mm\:ss"
- Culture
Culture information to be used when convert types, e.g. "en-us", "fr-fr".
- Treat boolean as number
- Allow data truncation
- Click
Import Schemas- Remove columns that aren’t needed
- Click on
Preview source(overlay) - Remove columns on the mapping
- Click on
- Remove columns that aren’t needed
Settings tab
You will be charged # of used DIUs * copy duration * $0.25/DIU-hour- Maximum data integration unit
- Default is
Auto(4). Change to2
- Default is
- Other options (no values by default)
- Degree of copy parallelism
Specify the degree of parallelism that data loading would use.
- Data consistency verification
When selecting this option, copy activity will do additional data consistency verification between source and destination store after data movement. The verification includes file size check and checksum verification for binary files, and row count verification for tabular data.
- Fault tolerance
When selecting this option, you can ignore some errors occurred in the middle of copy process. E.g. incompatible rows between source and destination store, file being deleted during data movement etc
- Enable logging
When selecting this option, you can log copied files, skipped files and rows
- Enable staging
Specify whether to copy data via an interim staging store. Enable staging only for the beneficial scenarios, e.g. load data into Azure Synapse Analytics via PolyBase
- Degree of copy parallelism
Save and Debug
- Save All
- Click
Debug
Verify the file was copied to Storage
- Go to the Storage Blob
- Open the container
- A file was created
dbo.DimCustomer.parquet- You cannot preview the Parquet file in the container
- If you run the pipeline again, it will overwrite the file.
- Click on the file for more details
- Back in the Data Factory pipeline, click
Publish
Copy Activity to connect from Blob Azure SQL
- Under
ActivitiesinMove & Transform - Drag/drop
Copy datato the empty canvas - Name it
Blob to AzureSQL
Set Source
- Select the dataset for the Blob Storage
- On
File path typeselectWildcard file path- It should show the container name
- And the file type
*.parquet
- Click
Preview data(to preview the Parquet file)
Set the Sink
- Select the dataset for the Azure SQL Database
- Write behavior
UpsertUse TempDB(enabled by default)If you write large amount of data into SQL database, uncheck this and specify a schema name under which Data Factory will create a staging table to load upstream data and auto clean up upon completion. Make sure the user has create table permission in the database and alter permission on the schema. If not specified, a global temp table is used as staging.
Key columns- Select the value
CustomerKey Choose which column is used to determine if a row from the source matches a row from the sink
- Select the value
- Other options (keep default or change)
Bulk insert table lock- Set to
No Use this to improve copy performance during bulk insert operation on table with no index from multiple clients.
- Set to
Table Option- Set to
None
- Set to
Pre copy script- Empty
Specify a script for Copy Activity to execute before writing data into sink table in each run. You can use this property to clean up the pre-loaded data.- You can use SQL here such as
delete from DimCustomer
Set Mapping
- Click
Import schemas - The left side is the Parquet file. The right side is the table in Azure SQL
Settings tab
- Change
Max data integration unitfromAutoto2
Connect the copy activities
- Click on the copy activity
OnpremSQL to Blob - Drag the arrow from here to
Blob to AzureSQL
Save and Debug
- Save All
- Click
Debug
Verify the file was copied to Azure SQL
Go to Azure Data Studio and connect to the Azure SQL Database.
Query the table DimCustomer.
SELECT COUNT(*) FROM DimCustomer;

SELECT TOP 20 * FROM DimCustomer;
Publish the Pipeline
Back in the Data Factory pipeline, click Publish
Update Onprem SQL Server, run pipeline, and see change in Azure SQL
Test the Upsert setting in the Sink of the copy activity Blob to AzureSQL.
- Change some values in the on-premise SQL Server database
- Add some values to the database
- Run the pipeline
- Verify the changes in Azure SQL Database
On-premise SQL Server
- Connect to the Server with the Self-Hosted Integration Runtime
- Open SSMS
- Connect to the SQL Server
Change the first row where CustomerKey is 11000
UPDATE DimCustomer
SET YearlyIncome = 120000
WHERE CustomerKey = 11000;
Change the last row where CustomerKey is 29483
UPDATE DimCustomer
SET TotalChildren = 1
WHERE CustomerKey = 29483
Insert a row
INSERT INTO DimCustomer (CustomerAlternateKey, FirstName, LastName, EmailAddress, MaritalStatus, TotalChildren)
VALUES('AW00029485', 'Homer', 'Simpson', 'homer@simpson.com', 'M', 3);
Run Data Factory Pipeline
- Click
Debug - On the
Outputtab, browse over the row and there is aglassesicon. - Clicking on this icon shows the details of the run.
**Verify the data was updated/copied to Azure SQL
Go to Azure Data Studio and connect to the Azure SQL Database.
Query the table DimCustomer.
SELECT * FROM DimCustomer WHERE CustomerKey = 11000;

SELECT * FROM DimCustomer WHERE CustomerKey = 29483;

SELECT * FROM DimCustomer WHERE CustomerKey = (SELECT MAX(CustomerKey) FROM DimCustomer);
Trigger to schedule the pipeline
See Azure Data Factory Scheduling
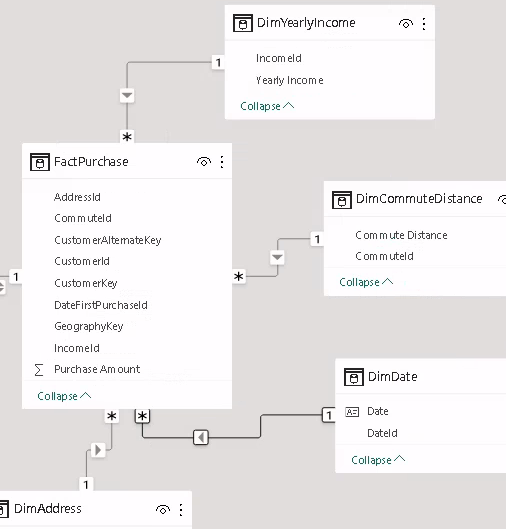
Power BI to Azure SQL Database
Created a star schema from 1 table
I got creative using 1 table to create a star schema because the table I copied didn’t have any transactional values. Just to illustrate this blog post I created a custom column called PurchaseAmount based on the distinct values of another column.
Created DAX measures
Total Purchased by Marital Status
Total Purchase Married =
CALCULATE(
    SUM(FactPurchase[Purchase Amount]),
    DimCustomerDetail[MaritalStatus] = "M"
)

Total Purchase Single =
CALCULATE(
    SUM(FactPurchase[Purchase Amount]),
    DimCustomerDetail[MaritalStatus] = "S"
)
To be continued
- Create a product table corresponding to each distinct Purchase Amount, add a picture link
- The report has a dropdown to filter by product
- The left bar shows the product picture, product name, and total sales card
- The canvas shows sales measures based on dimCustomer and a line chart of sales over time
- Measures: marital status, income, house owner, commute distance