Azure Data Factory Scheduling
Scheduling jobs in Azure Data Factory.
Setup the resources for this tutorial
Create resources
- Create a Blob Storage
- Create two containers
inputandoutput - Upload a CSV file to
input
- Create two containers
- Create a Data Factory
- Create a Linked Service to Blob
- Create a Dataset for Blob input with the filepath pointing at the CSV uploaded file
- Create a Dataset for Blob output with filepath pointing at the output container
- Create a pipeline with a Copy Activity with source/sink set to the input/output datasets
- Click
Debugto test the initial setup
Set parameters for the datasets
- In the Input dataset
- Create a parameter
fileName(String) and replace theConnectionfilepath
- Create a parameter
- In the Output dataset
- Create a parameter
fileName(String) and replace theConnectionfilepath
- Create a parameter
- In the Copy Activity
- Set the source
fileNamevalue as thefile.csvuploaded to the input blob - Set the sink
fileNamevalue as the samefile.csvwhich will be copied to output blob
- Set the source
- In the Pipeline
- Save all and Publish.
- Click
Debugto test this setup
Add a Schedule Trigger
Before creating the trigger, make sure the pipeline was Published.
On the pipeline UI, click Add trigger, then New/Edit
- Click on the
Choose triggerfield and thenNew - Enter a name like
WeeklySchedule - Enter a description like
Run pipeline daily at 5AM UTC - Select as Type
Schedule- Other options are
Tumbling window,Storage events, andCustom events
- Other options are
- Enter a
Star date - In
Recurrenceselect an interval- For example, Every
1 Day
- For example, Every
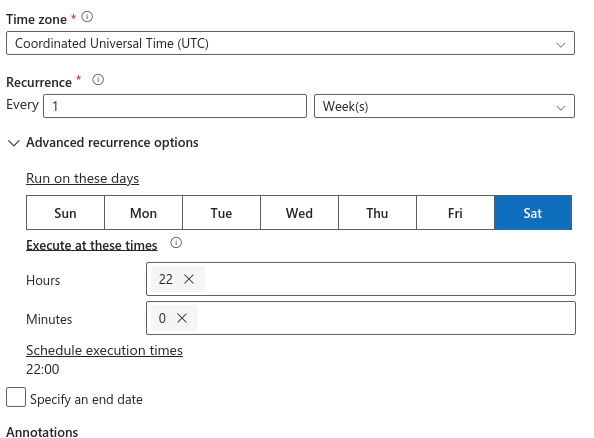
- In
Execute at these times- A warning says
Hours must be in the range 0-23 and minutes in the range 0-59. The time specified follows the timezone setting above. - Hours, enter
5 - Minutes, enter
0 - This populates the field
Schedule execution times 5:00
- A warning says
- Optionally, select an
end date - Keep the default
Start trigger on creation - Click
OK - Click on
Save allandPublishto take effect. - The trigger can be found in the
Managehub, underTriggers
Be aware of the Recurrence as this will affect the billing cost of running the pipeline. See Azure Data Factory Pricing.
Add a Storage Event Trigger
You can execute a trigger as soon as files are loaded into Blob Storage.
Register the resource in your Azure subscription
- In Azure search for
subscription - Select your subscription
- On
Settings/Resource providers - Search for
EventGrid - Click on
Register
Set a Pipeline parameter
- Click on the pipeline canvas
- Under
Parameterscreate one calledfileName(String) - In the Copy Activity
- In
Source, for thefileNameparameter, select dynamic content, then select the parameter - In
Sink, do the same, which should be the expression@pipeline().parameters.fileName
- In
- Click
Save all, thenDebugto test this setup. ThenPublish
Create the event trigger
On the ADF pipeline UI, click Add trigger, then New/Edit
- Click on the
Choose triggerfield and thenNew - Enter a name like
NewBlobEventTrigger - Enter a description like
Run pipeline as soon as new files are loaded to Storage Blob - Select as Type
Storage events - Select the
Azure subscription - Select the
Storage account name - Enter the
Container namewith leading and trailing forward slash such as/your-container/ - Enter a
Blob path begins(optional)Blob path’ must begin with the path. For example: '2018/april/shoes.csv' or '2018/'- In my case I had two folders in the container
inputandoutput - I entered the path as
input/
- Enter a
Blob path ends(optional)‘Blob path’ must end in a file name or extension. For example, 'shoes.csv' or '.csv'. Container and folder name are optional but when specified they must be separated by a '/blobs/' segment. For example '/orders/blobs/2018/april/shoes.csv'. To specify a folder in any container omit the leading '/' character. For example, 'april/shoes.csv'.- I entered
.csv
- Select the
EventChoose which events are associated with this trigger- Select
Blob created
- Keep the default
Ignore empty blobsasYes - Keep the default
Start trigger on creation - Click
OK - A new window shows
Data previewEvent trigger filtersshow the setup- Container name:
scheduletrigger(this is how I named my container) - Starts with:
input/ - Ends with:
.csv
- Container name:
- Below this said
3 blobs matched in "scheduletrigger"- input/alabama-dbe.csv
- input/alaska-dbe.csv
- input/oklahome-dbe.csv
- Click
Continue - A new window shows
New trigger- Enter value
@triggerBody().fileName- The
Event Event GridAPI returns a@triggerBody() - As seen in the MS docs here.
- The storage event trigger captures the folder path and file name of the blob into properties
@triggerBody().folderPath@triggerBody().fileName- In Synapse use
@trigger().outputs.body.fileName
- In Synapse use
- The
- Enter value
- Click
Save allthenPublish - The trigger can be found in the
Managehub, underTriggers
Event trigger activates on new blobs
The trigger won’t activate with blobs that were previously uploaded. It will trigger once a new blob with .csv is loaded to the container/directory scheduletrigger/input.
For example if a new file file.csv is added to scheduletrigger/input:
@triggerBody().fileNamehas a value offile.csv- This value is mapped to the pipeline parameter
fileNamein@pipeline().parameters.fileName
Upload a file to the container
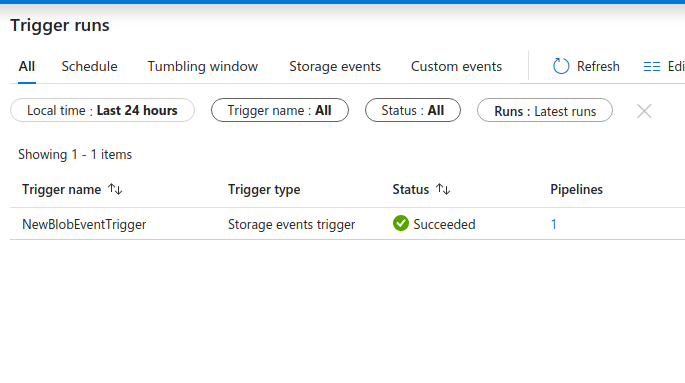
Test the trigger by uploading a .csv file to the blob container.
Then go to the Monitor hub to see if the pipeline was triggered.
The trigger doesn’t run
- Make sure that you
Publishthe pipeline - Check the pipeline parameter expression
- Check the
triggerBodyexpression.
This tutorial is based on Adam’s video here where he explains how to use triggers in ADF.