PowerBI PowerQuery Create a Dimension Date Table in M
Create a dimension Date table in PowerBI PowerQuery using M.
Motivation
Traditionally there are two ways of adding a Date table to your star schema:
- In the backend (PowerQuery) Use a Date table from your source (SQL Database)
- In the frontend (PowerBI) Create a Date table using DAX
My main objection of using DAX is that the table is created in the front end of Power BI. You cannot see the table in the backend in Power Query.
If you apply software design principles to Power BI like separation of concerns. Then you wouldn’t create tables in the frontend of Power BI using DAX. Also conceptually DAX is used to analyze the data after the data is loaded. While M is used for ETL.
Must have a Date table in your data model
As described in the Microsoft docs here you must have at least one date table in your model.
In Power BI, in any of the views (report/data/model) you can right-click on the Date table and select Mark as date table. However, you will get an error if you don’t meet these requirements:
- The date column cannot have missing dates
- It must have unique values
- It cannot have null values
- The column should be of type
date
Advantages of using DAX to create the Date table
You can use one line of code using either DAX function CALENDAR or CALENDARAUTO. With CALENDARAUTO it generates a date range based on all dates stored in the model.
Disadvantage
If you go to Power Query, you won’t see the Date table there. Generating this table is not bi-directional. If it’s in Power BI using DAX, it won’t be in Power Query.
Creating the Date table with Power Query using M
The same MS doc has an external link to a blog post on how to generate a Date table with Power Query. The code is rather easy to understand but learning all that M code might be unnecessary.
Assumption
I am assuming that there is a fact table with a date column and you want to create a Date table from this column using the minimum and maximum dates.
Setup the table in Power Query
- In Power Query
- Create a New Query, select
Blank query - On the Home tab, open
Advanced Editor - Remove the default code
- Set
Display Optionsand enableDisplay line numbers
Use Power Query to complete the Date table
Then use Power Query to:
- Convert the list to a table
- Convert the column to date
- Create additional columns for year, month name, quarter, week of year, and day name
- Create an index for the date column
M code to create the date table
M functions
Table.Buffer- Load into memory the table that has the date column.
- Assign it to a variable.
List.MinandList.Max- Get the minimum and maximum date values from the date column
List.Dates- Min value, max value, and duration, to create a list of dates.
Duration.Days(MaxDate - MinDate) + 1- Plus 1 to include the
MaxDate
- Plus 1 to include the
#duration(1,0,0,0)- Interval: 1 day, 0 hours, 0 minutes, 0 seconds
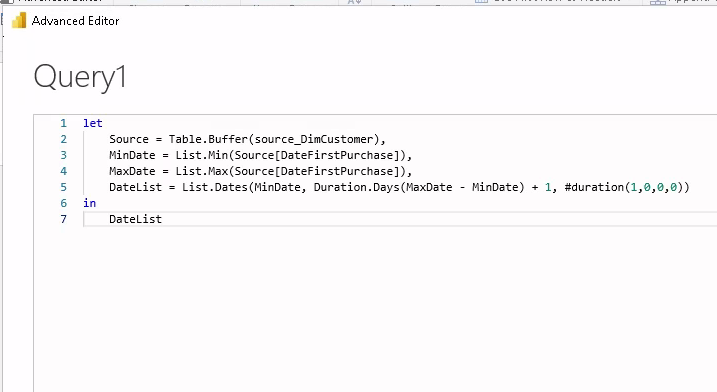
Inside the Advanced Editor:
let
    Source = Table.Buffer(factSales),
    MinDate = List.Min(Source[DatePurchase]),
    MaxDate = List.Max(Source[DatePurchase]),
    DateList = List.Dates(MinDate, Duration.Days(MaxDate - MinDate) + 1, #duration(1,0,0,0))
in
    DateList
My source table was called source_DimCustomer and date column was DateFirstPurchase
Complete the Date table
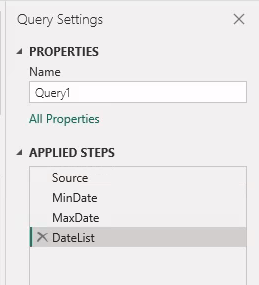
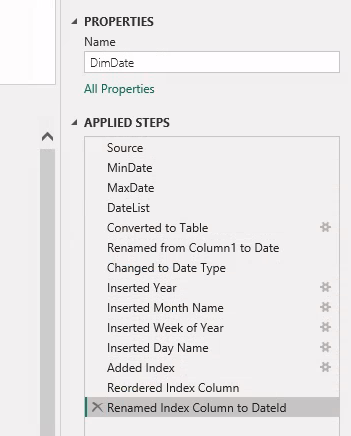
Four steps are applied to the query: Source, MinDate, MaxDate, and DateList.
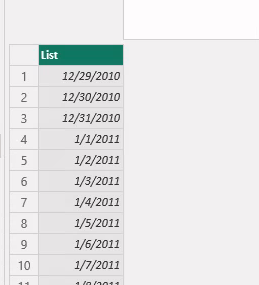
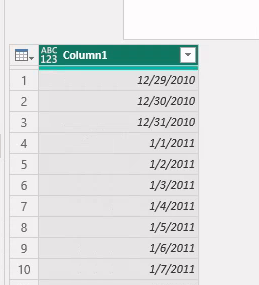
The table shows that it’s a list.
Use the Transform menu and To Table. On the popup window click OK
Complete the table:
- Rename the query to
DimDate - Rename the column to
Date - Convert the type to
Date - On the menu tab
Add Column - Click on the
Datedrop down - While selecting the
Datecolumn. Add columns for:- Year
- Name of Month
- Week of Year
- Name of Day
- Add an Index column
- On the menu tab
Add column - On the
Index columndrop down - Select
From 1 - Move the Index to be the first column
- Rename to
DateId
- On the menu tab
The complete applied steps show:
Optimize Date table query
The code uses this:
Source = Table.Buffer(factSales)
If the source table is very large. In Power Query, create a new query to call the source table and enter a SQL query to only pull the necessary columns.
SELECT CustomerKey, DateFirstPurchase FROM dbo.DimCustomer;
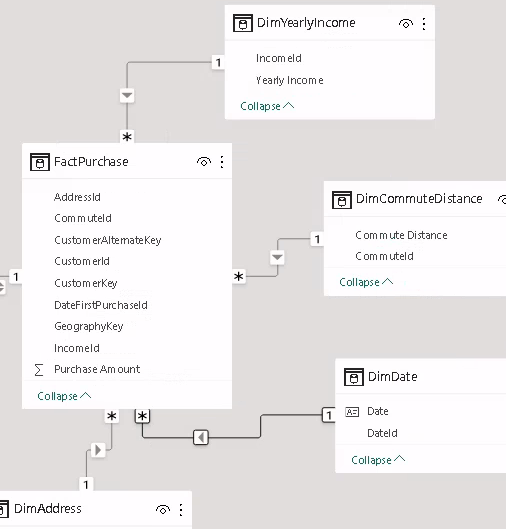
Star Schema
The star schema now looks like this: